Settings

Pressing the Settings button opens a screen for port and other settings
If a serial port exists it should show in the Port selector. Usually these are USB to serial converters and they will only show when it is connected. Older computers may have a built-in serial port.
The serial port speed is selectable between 9600 and 38400 bps, which are the only speeds available for the EVI-DXX cameras.
Mode is selectable between D30 and all other camera models.
Show Comms is checked if you want to see the actual commands sent to and received from the cameras.
Keep Log is checked if you want to create a log of the communications
General Controls
All of the control functions in this program are described in detail in the camera technical manuals: EVI-D70 Technical Manual and EVI-D80/90 Technical Manual.
The Port button is for stopping or starting the serial port. By default the serial port is started when the program is started and when the Settings screen is closed. If there is a failure of communications the port will be stopped, but can be restarted with this button after resolving the issue.
The Power button is for turning on and off the selected camera
Pan/Tilt
Panning and tilt control is performed with the buttons in the Pan/Tilt area, keypad keys on the keyboard or by use of a joystick or gamepad (see below). Not only can you pan left/right and tilt the camera up/down, you can do both at the same time. L/U is left and up, etc. The center will move the camera to the straight ahead position. You can also control how quickly the camera moves with the Rate slider; slow at the bottom and fast at the top. The keypad control uses the same directions as the buttons, but Center is represented there.
Zoom
Zoom control is performed with the Tele and Wide buttons in the Zoom area, the + and - buttons on the keypad or by use of the joystick or gamepad (see below). The rate of zooming is controlled with the Rate slider; slow at the bottom and fast at the top.
Focus
Focus is in Auto mode by default. To focus manually click on the Manual button to put a check in it. Then you can press the Far and Near buttons to adjust the focus. Infinity button sets the focus to as far as possible.
Presets
Preset positions (along with exposure and balance settings) are controlled in the Presets section. Each preset can have a title, which the user can set or edit by moving the mouse pointer to the field and clicking then typing. To set a preset, move the camera to the desired position, zoom, focus, exposure as desired then pressing and holding the number button for about a second. When the number changes to red it has ben set and you can release it. To move the camera to the preset position, etc. press the button momentarily; holding too long will set it.
Exposure
By default exposure is set automatically. Backlight adjusts exposure for a background that is too bright. Bright Mode allows adjustment of the exposure according to an internal algorithm, as adjusted by the slider. The gain and f-stop are displayed when in Bright Mode. Exp Comp (Exposure Compensation) adjusts the automatic exposure brightness level in steps as controlled by the slider.
White Balance
White balance is controlled by selecting one of the options: Auto, Indoor, Outdoor, One Push, Auto Tracing and Manual. Auto is the default. Indoor and Outdoor are self explanatory. One Push allows you to freeze an automatic balance by pressing the Trigger button when you like the balance. Auto Tracing provides additional handles changes of environment or color temperature. Finally, Manual allows selection of Red and Blue settings with sliders.
Camera
Up to seven cameras can be controlled with this control software. Each camera title can be edited. Just select the button next to the camera number to start controlling that camera. When the program starts, each connected camera is queried to see how many cameras can be controlled, then only those camera buttons are enabled.
Gamepad
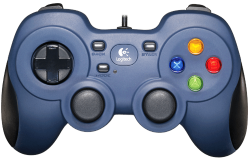
The type of control device is automatically detected. If a gamepad is used it should be compatible with Windows. A gamepad, as shown here, controls pan/tilt with the left joystick, zoom with the right joystick, presets with the colored buttons on the right, and camera selection with the POV hat on the left. If there is a selection for XInput/DInput the DInput should be selected. A preset is set by pressing the bottom button after moving the red box left or right (left/right buttons) to highlight the preset. You select the preset by pressing the top button.
Joystick
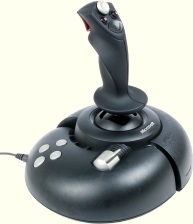
If a joystick is used it should be compatible with windows. A joystick, as shown here, controls the pan/tilt with the joystick handle, zoom is controlled by rotating the handle, presets with the buttons on the base, and camera selection is with the POV hat on the handle. See the Gamepad section for a description of presets.
copyright © 2022 Autonomous Systems